Agency Mode Overview
Agency Mode is built for agencies and partners who want to launch and manage Facebook + Instagram client campaigns without Ads Manager chaos, spreadsheet tracking, manual reporting, or chasing ad spend. You can run unlimited client campaigns, use template-based campaign builders, configure billing, automate lead routing, and generate client-ready reports from a single dashboard.
Who This Guide Is For
- Agency owners who want to add paid social as a service (or scale it)
- Operators managing multiple clients and pages
- Teams who want fast launch, consistent workflows, and repeatable results
Prerequisites (Read This First)
1) You must have Page admin access (manual step outside Walled Garden)
To run ads from a client's Facebook Page, the client must add you as an admin of their Facebook Business Page (this happens in Facebook/Meta, not inside Walled Garden).
Once that's done, you'll see the client's Facebook Page appear in your Walled Garden dashboard as an available Page you can run ads from.
Why it matters: If you don't see the client Page in Walled Garden, it's usually because admin access wasn't granted yet.
2) Recommended Setup Order
- 1Add client
- 2Confirm their Facebook Page appears in your account
- 3Configure Pages → Lead Notifications (lead routing recipients)
- 4Launch campaigns + choose lead routing per ad
- 5Confirm reporting + billing
How Agency Mode Works (High-Level Flow)
From zero to live campaign:
Add Client
Business info + connect Page
Select a Template
Choose a proven campaign framework
Customize + Launch
AI assists the rest
This is designed to cut launch time down to minutes instead of hours.
A) Accessing Agency Mode
Step 1 — Log in to Walled Garden
Log into your Walled Garden branded platform account.
Step 2 — Open the Agency tools from your dashboard
In your main Walled Garden dashboard, use the left-side navigation to access Agency Mode features.
You'll primarily use:
- Partner
- Clients
- Templates
- Analytics
- Billing
- Pages
(Important: Pages is in the left nav, not inside Partner/Clients)
B) Partner Tab (Agency Entry Point)
What the Partner Tab is for
The Partner tab is the hub for agency-level workflows and controls — think of it as your "agency operator" area for managing the client universe you control.
Step-by-step
- 1In your Walled Garden dashboard, go to Partner.
- 2From Partner, go to Clients.
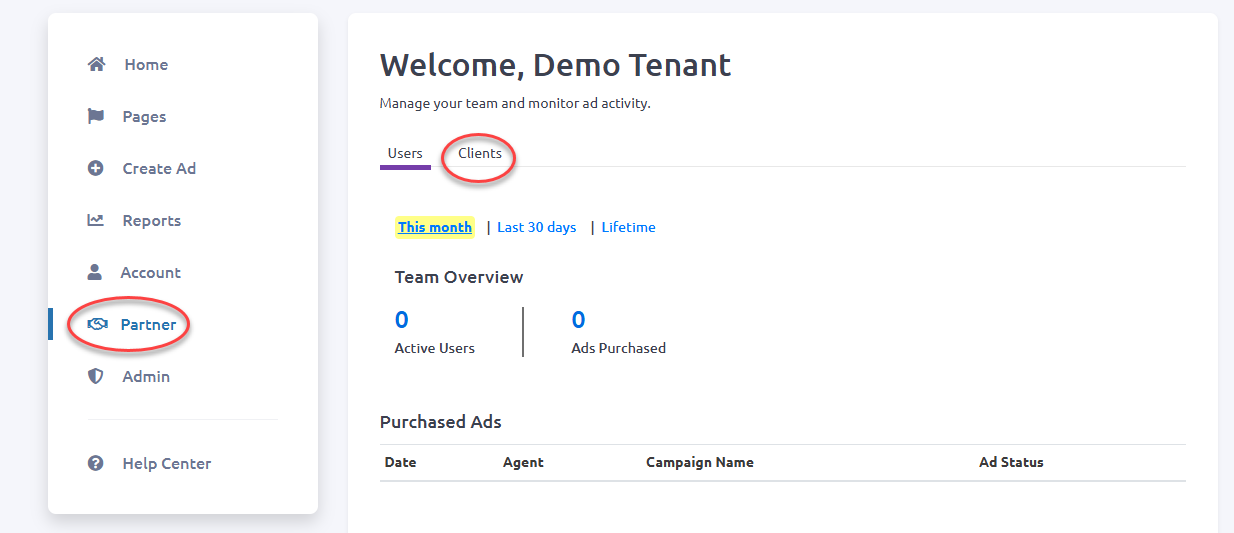
C) Clients (Adding, Managing, and Launching Client Work)
Step-by-step: Add New Client
- 1In your Walled Garden dashboard, go to Partner.
- 2Click Clients.
- 3Click Add New Client.
- 4Enter the client's info (business name, contact details, etc.).
- 5Connect or select the client's Facebook Page (when available).
What "Add New Client" does
- Creates a client record in your Agency account
- Stores client business info privately inside your dashboard
- Sets up the client as a selectable entity across campaigns, billing, routing, and reporting
Important: Clients do not need to log in for you to manage their campaigns — you control everything from your dashboard.
Inside Clients, you should expect to see:
- Search clients quickly
- View client status (Active / Pending / Paused)
- View key activity metrics (campaigns, leads, ad spend—depending on what's running)
- Open a specific client record to manage their campaigns and details
Common statuses
- Pendingoften means setup is incomplete (page access, billing method, or campaign not launched yet)
- Activeindicates campaigns are live and/or client is fully configured
Step-by-step: Launch using templates
- 1Open Clients and select the client you want to run ads for.
- 2Click Create Campaign (or equivalent "Launch" action).
- 3Select a Template from the template library.
- 4Customize campaign details (offer/listing/event, targeting, budget, schedule, creative, etc.).
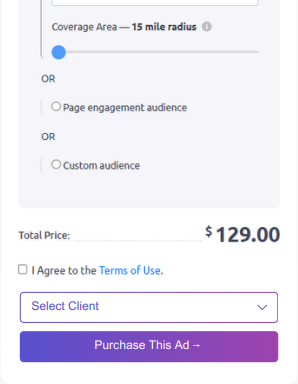
- 5Confirm billing method (client card selection).
- 6Confirm lead routing (for lead gen campaigns).
- 7Click Launch.
What templates do
Templates are proven campaign frameworks that speed up build time and reduce guesswork. They're designed to make launching repeatable and consistent across clients.
D) Pages (Lead Routing Setup — Detailed)
The Pages tab is in the main dashboard left-hand menu.
It does not live inside the Clients tab or the Partner tab.
This Pages area is where you configure lead routing recipients at the Facebook Page level, so those recipients become available later during campaign setup.
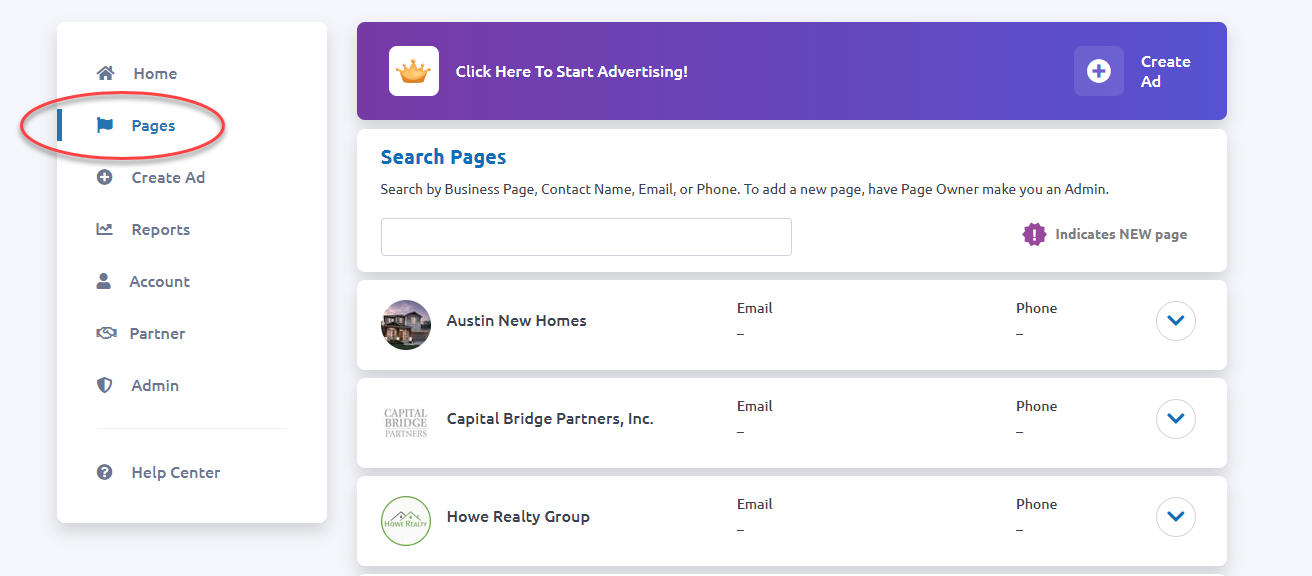
The Pages tab is where you set up Lead Routing for each client based on the Facebook Business Page you will be running ads from.
Once recipients are added to a Page, you can select which recipient(s) receive leads per individual ad during lead gen campaign setup.
- 1In your Walled Garden dashboard, click Pages (left menu).
- 2Select the Facebook Page you want to configure.
- 3Click Lead Notifications.
- 4Add the contact info of each person who should receive lead notifications for lead gen campaigns tied to this Page.
- 5Save.
Example recipients: Sales team inbox, Agent A, Agent B, Inside Sales Rep, etc.
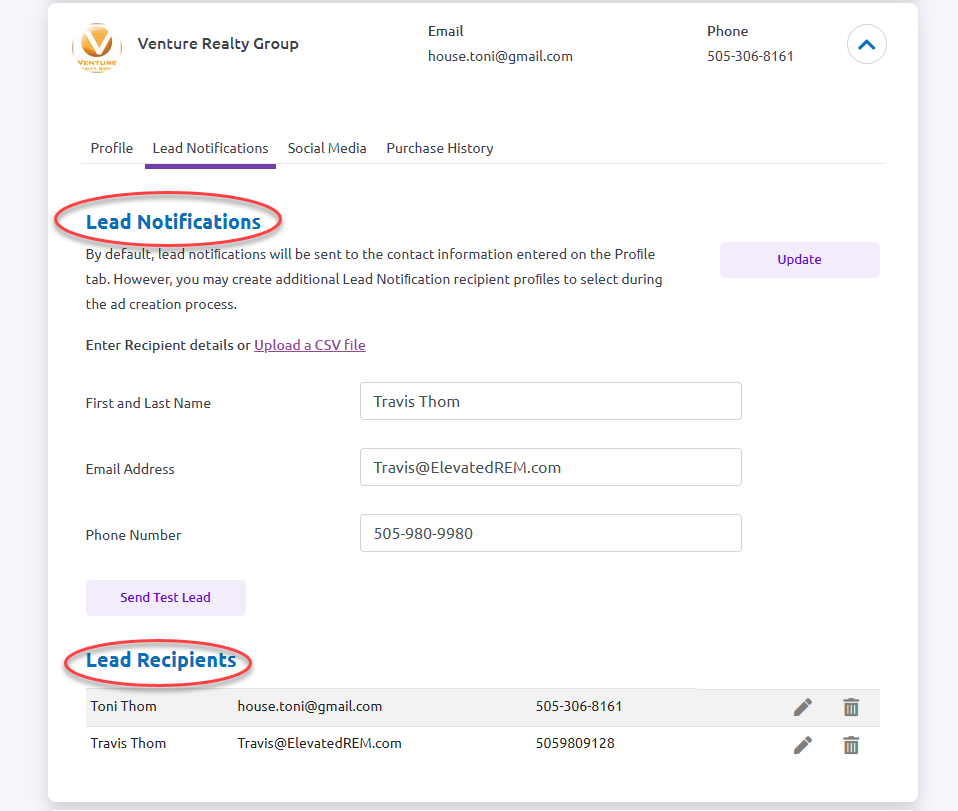
What this does
- Creates a recipient list tied to that specific Facebook Page
- Makes those recipients selectable later from the Lead Routing dropdown in campaign/ad setup
- Ensures leads captured from Facebook/Instagram lead forms go to the right people automatically (email/SMS/CRM, depending on your configuration)
When you build a Lead Generation campaign, you will reach the lead form / lead details setup step. Inside that step, you'll see a Lead Routing dropdown that lets you choose a lead notification recipient from the Business Page you're using for that ad.
Key concept
You can run multiple lead gen ads from the same Facebook Page, and route leads to different recipients per ad.
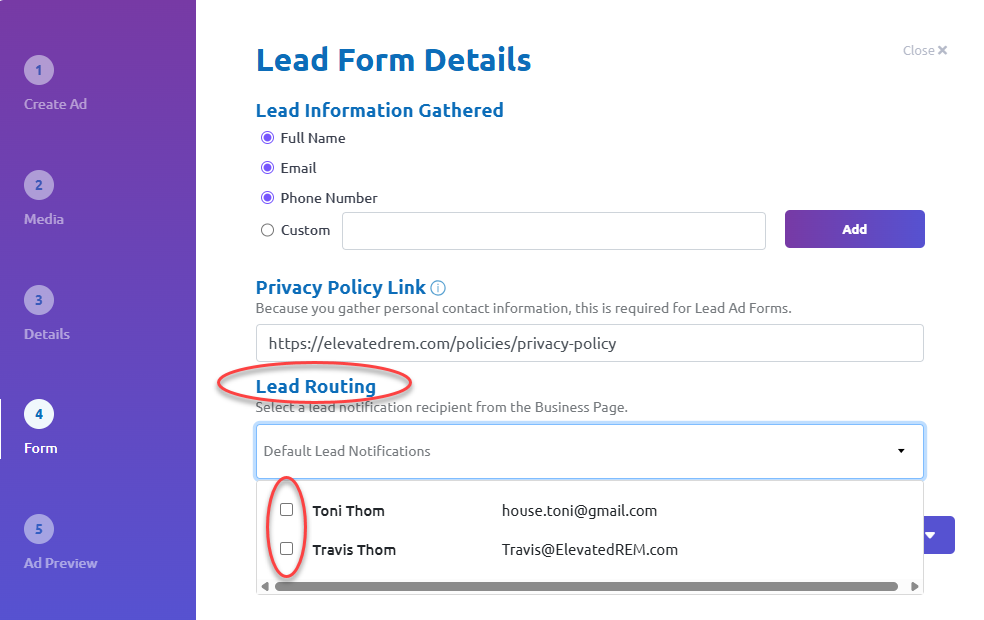
Example (same Page, different recipients per ad)
One Facebook Page
Three recipients added in Pages → Lead Notifications:
- • Sales Team
- • Agent A
- • Agent B
Campaign setup:
- • Ad #1 → routes to Sales Team
- • Ad #2 → routes to Agent A
- • Ad #3 → routes to Agent B
All from the same Page — fully controlled per ad.
- Configure Pages first (add recipients before you build campaigns)
- Add all potential recipients upfront so they appear in the dropdown later
- Always double-check the Lead Routing dropdown before launching
- If someone doesn't appear in the dropdown, they are not added to that Page yet
E) Billing (Client Cards + Campaign Billing)
What billing is designed to do
Agency Mode is built to eliminate invoicing friction:
- Store client payment methods (cards on file)
- Select which card gets billed at campaign launch
- Reduce back-and-forth and "ad spend chasing"
Step-by-step: Billing Workflow (Recommended)
- 1Add the client in Partner → Clients
- 2Have the client add their card (via your secure process/link)
- 3When launching a campaign, select the client card during setup
Pro Tip
Standardize naming conventions for client cards (e.g., "Apex Realty – Visa – Ending 1234") so your team always selects the right one.
F) Lead Routing Destinations (CRM / Email / SMS)
Depending on your account configuration, lead routing can deliver leads to:
- CRM integrations (e.g., Follow Up Boss, HubSpot, kvCORE, Salesforce, etc.)
- Email notifications
- SMS notifications
The key is: Recipients are managed at the Page level, then selected per ad at launch time.
G) Reporting (Automatic Client-Ready Reports)
What reporting does
Agency Mode can generate clean, client-ready reporting so you don't have to build manual reports or spreadsheets. Reports are designed to show performance highlights, targeting details, and campaign configuration in a client-friendly format.
Step-by-step: Generate and Share a Report
- 1Go to the client's campaign area (via Clients or Analytics, depending on your navigation).
- 2Open the campaign you want to report on.
- 3Click Report / Generate Report / View Report.
- 4Share via link or export options available in your platform.
What to check before sending
- • Correct client name/branding
- • Correct date range
- • Correct campaign selected
H) Analytics (Agency-Wide Performance Visibility)
What analytics is for
Analytics gives you a single place to review performance across:
So you can spot what's working and scale it across accounts.
Suggested Agency Rhythm
- Weekly: Review top clients, best templates, best CPL
- Monthly: Standardize "winning" templates and offers across similar clients
I) Templates (How to Scale Fast Without Reinventing Campaigns)
What templates are for
Templates let you:
- Launch consistent, proven campaigns quickly
- Reduce build errors
- Scale best performers across multiple clients
Best Practice: "Template Playbooks"
Create an internal playbook that maps:
- • Template → Best use case
- • Template → Best creative angles
- • Template → Recommended budget + targeting defaults
J) Common Mistakes (And How to Avoid Them)
"I can't see the client's Facebook Page."
The client probably hasn't added you as a Page admin yet (manual step outside Walled Garden).
"The lead recipient I need isn't showing up in Lead Routing."
Add them first in Pages → select Page → Lead Notifications.
"Leads are going to the wrong person."
Double-check the Lead Routing dropdown per ad before launch.
Remember: routing is per ad, not just per campaign.
K) Quick Checklist (Launch-Ready)
Before launching a lead gen campaign, confirm:
- Client added in Partner → Clients
- Client Page is visible (admin access granted in Meta)
- Recipients added in Pages → Lead Notifications
- Correct recipient selected in Lead Routing dropdown
- Correct billing method selected
- Campaign details reviewed (budget, dates, targeting, creative)