Quick Answer
Go to business.facebook.com → Settings → People → Add people → Enter their email → Choose "Full control" or "Partial access" → Send invitation. They'll receive an email to accept within 30 days.
Understanding Access Levels
Facebook now uses two main access levels instead of the old "Admin/Editor/Moderator" roles:
Full Control
The equivalent of "Admin" — complete access to everything:
- Add or remove other people
- Manage all Page settings
- Create, edit, and delete posts
- Create and manage ads
- View all insights and analytics
- Delete the Page entirely
Partial Control
Limited access — you choose what they can do:
- Content: Create/manage posts
- Messages: Respond to DMs
- Community: Manage comments
- Ads: Create/manage ads
- Insights: View analytics
- ✗Cannot add/remove other people
Important Security Note
Only give Full Control to people you trust completely. They can remove you from your own Page. Use Partial Control for contractors, agencies, and team members who don't need admin privileges.
Step-by-Step: Add Admin on Desktop
Follow these steps using Meta Business Suite on your computer:
Go to Your Facebook Business Page
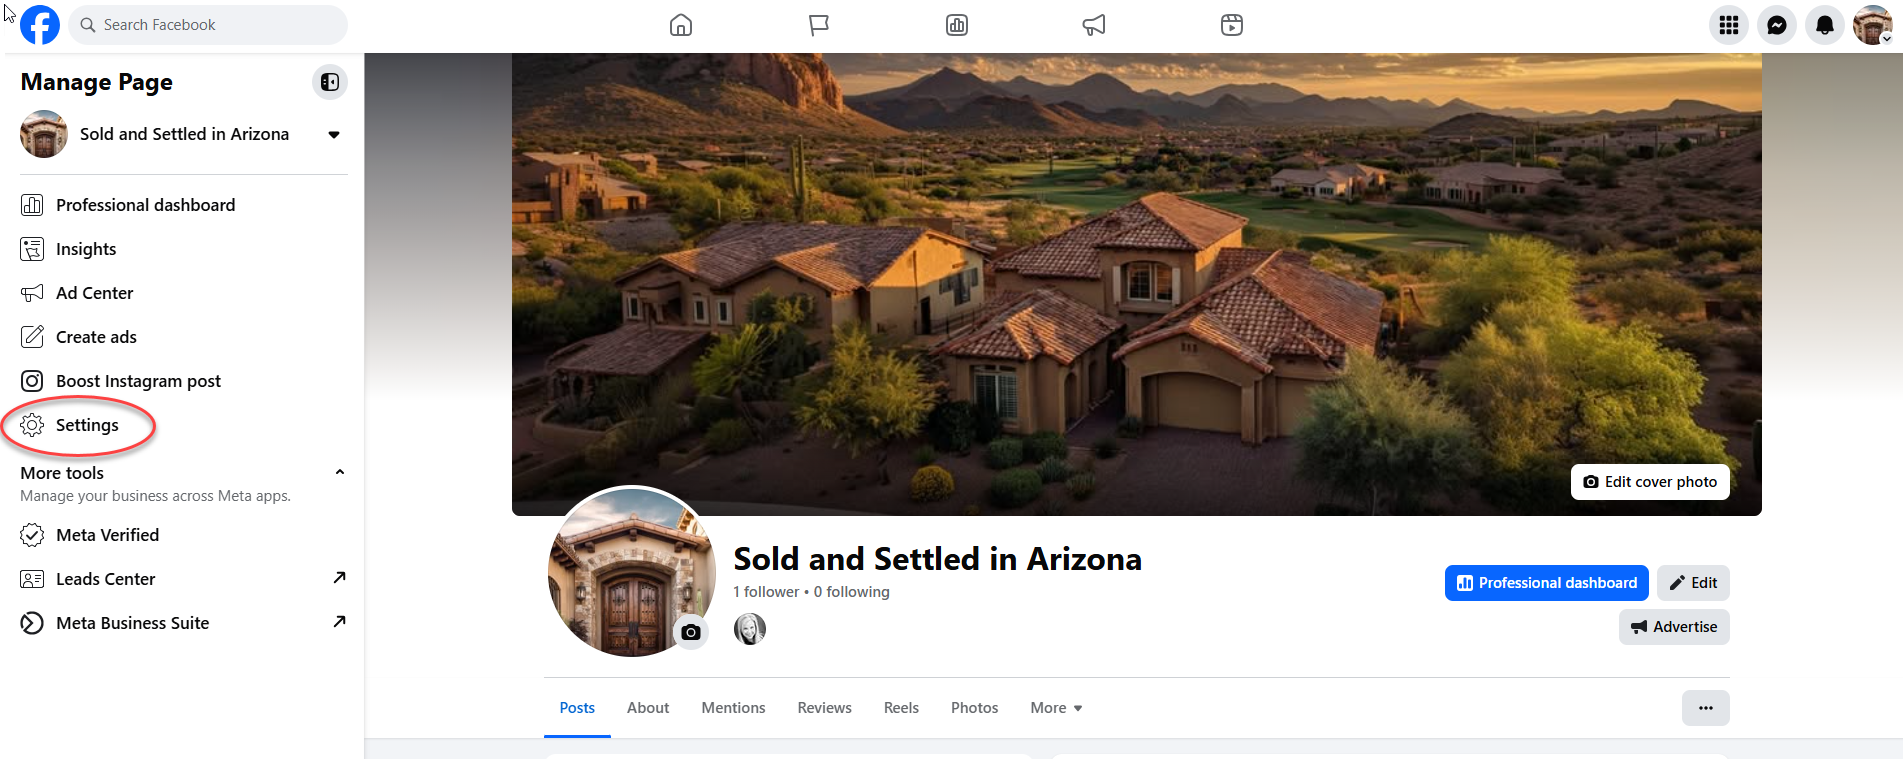
Navigate to your Facebook Business Page and look for "Settings" in the left sidebar menu under "More tools".
Make sure you're logged in with an account that already has admin access to the Page. The Settings option will be visible in the sidebar.
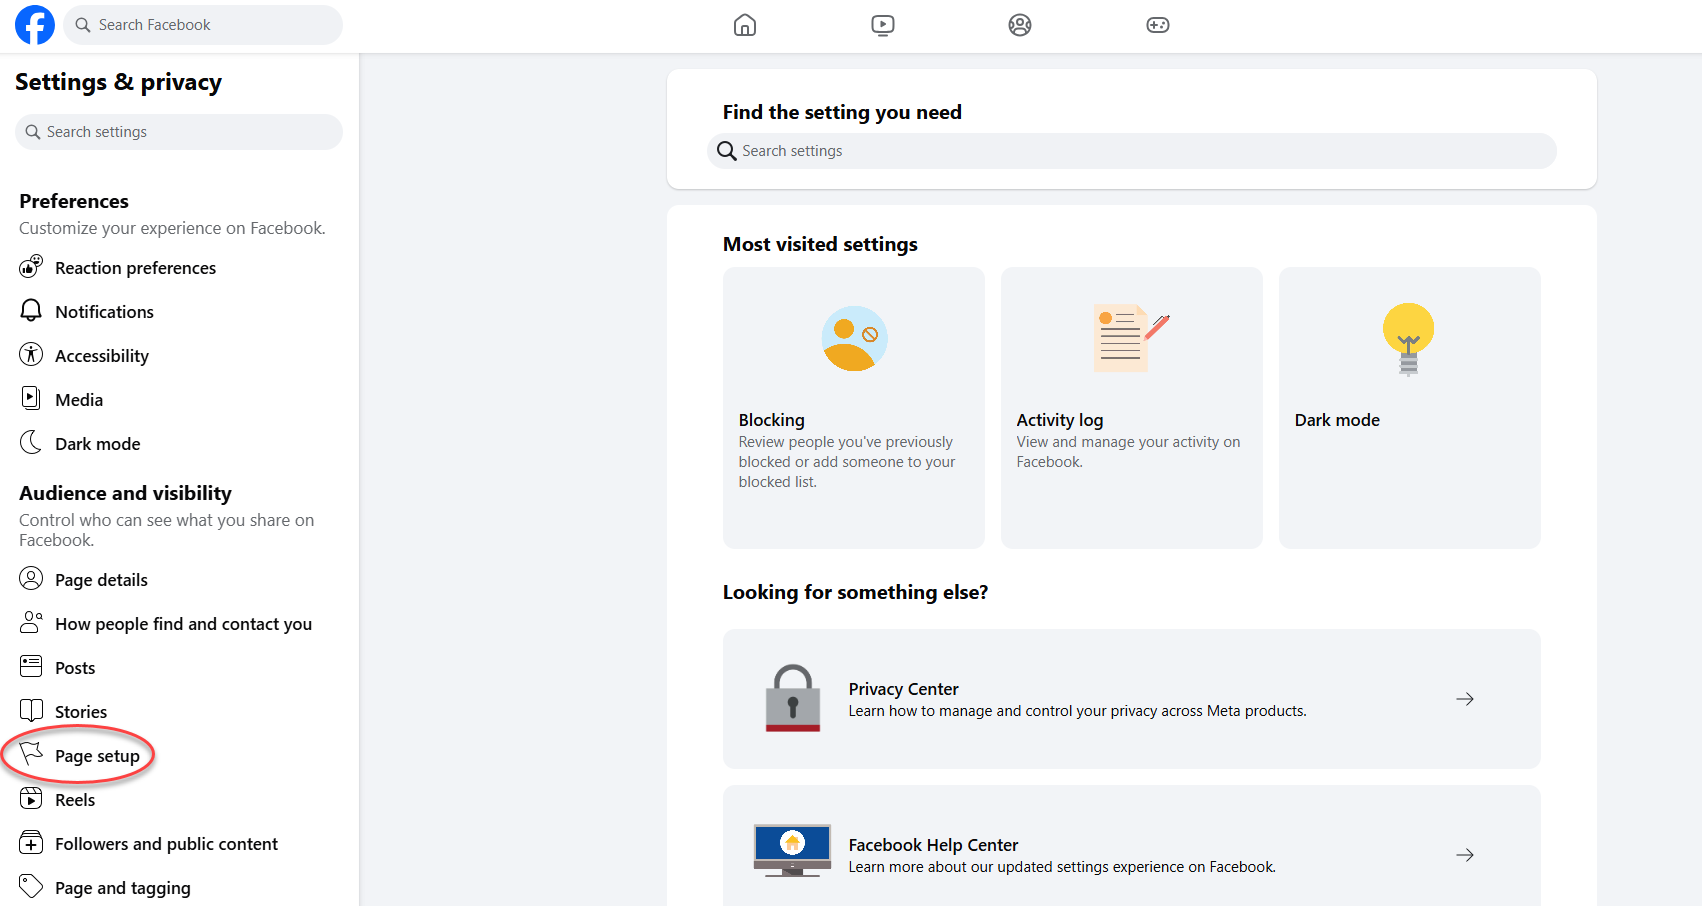
Click on "Page setup"
In the Settings & privacy sidebar, scroll down to "Audience and visibility" section and click on "Page setup".
This is where you'll find options to manage who has access to your Page.
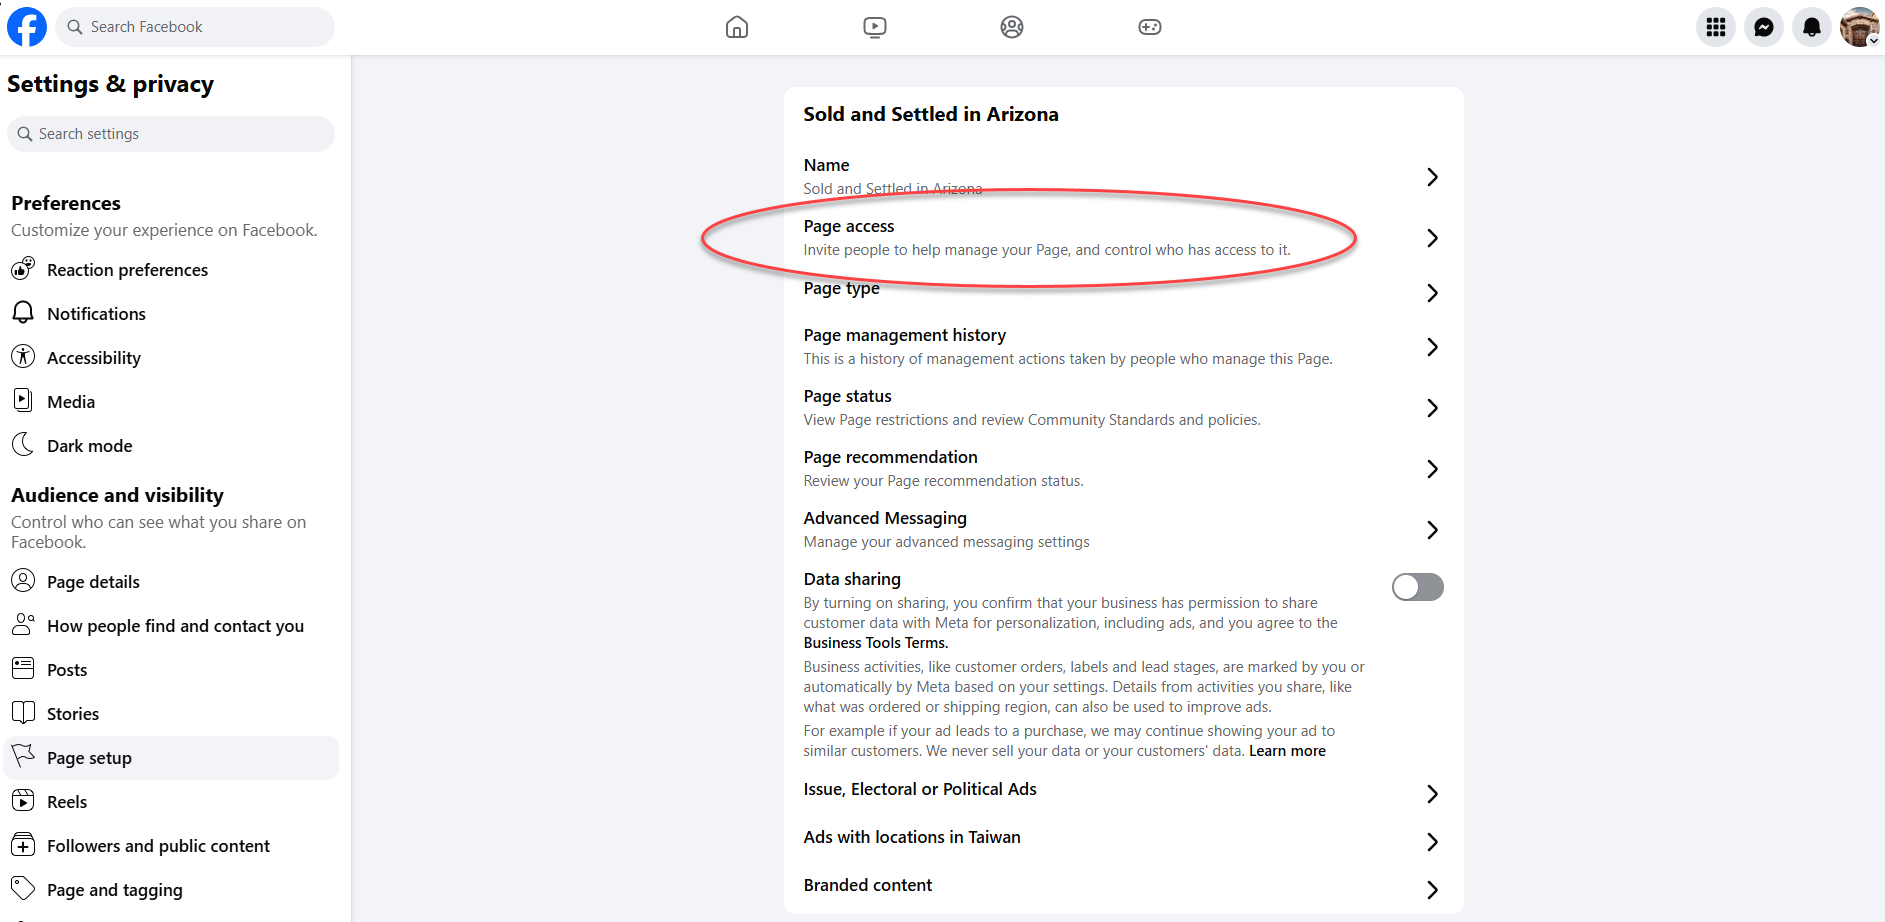
Click on "Page access"
In the Page setup screen, click on "Page access". This is where you can invite people to help manage your Page and control who has access.
You'll see the description: "Invite people to help manage your Page, and control who has access to it."
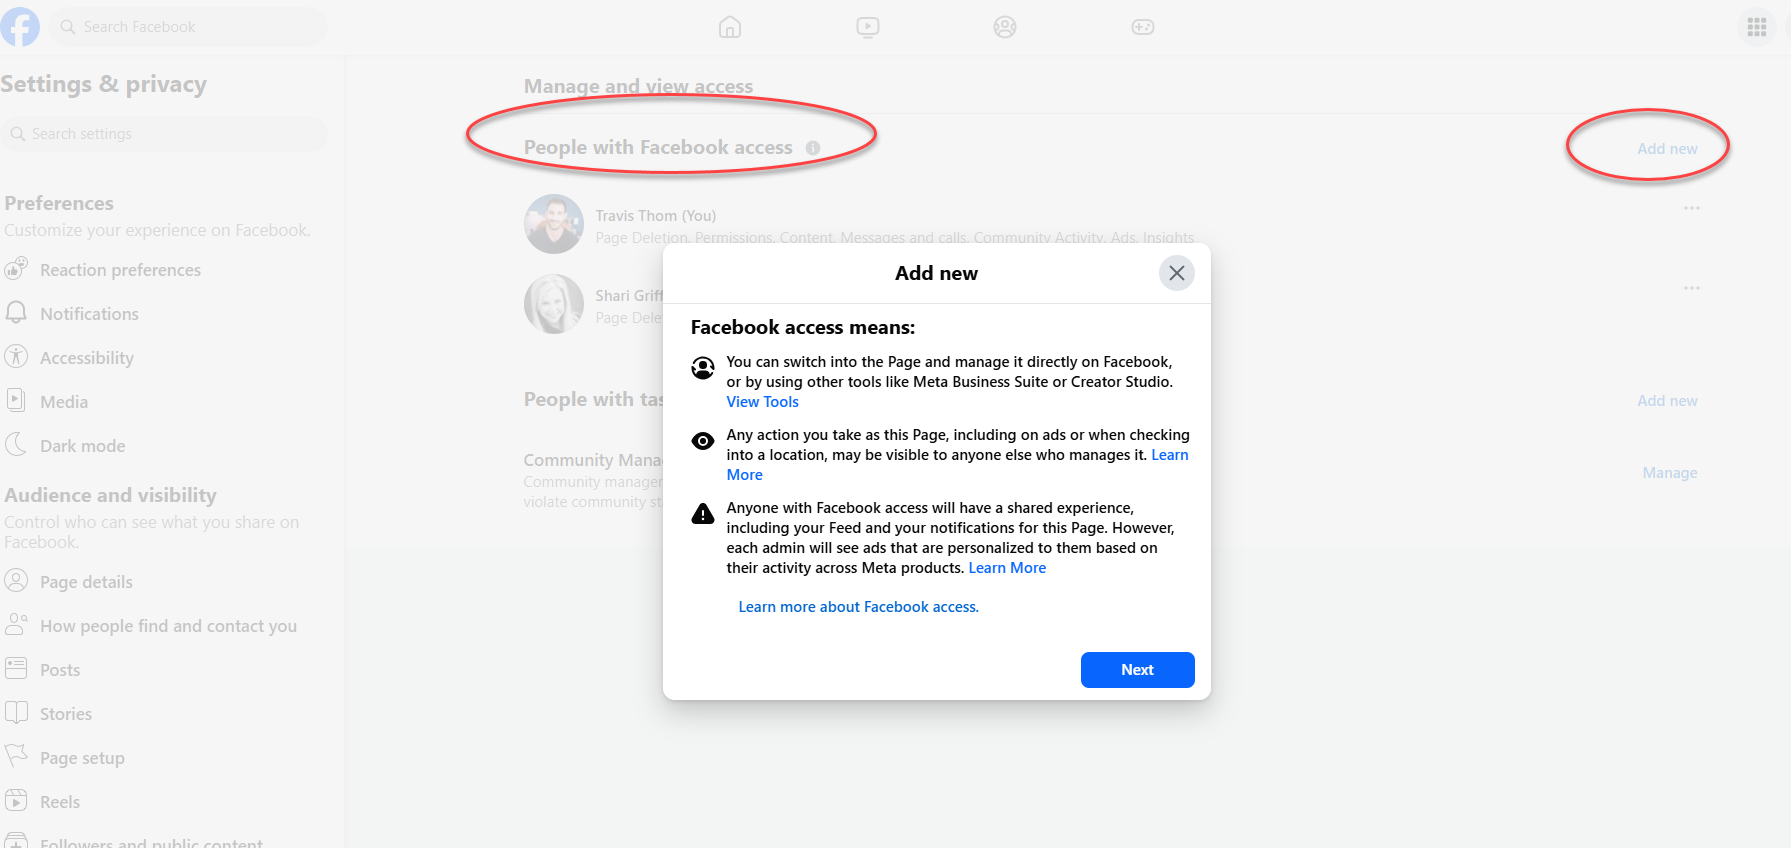
Click "Add new" under People with Facebook access
Under "People with Facebook access", click the "Add new" link on the right side. A pop-up will appear explaining what Facebook access means.
Click "Next" to continue to the invite screen.
Enter their email address
In the "Invite People" screen, enter the email address of the person you're inviting. Using email is more secure than searching by name.
Press Enter after typing the email, then click Next.
Invite people
Connecting Your Pages to Walled Garden
Once you've been added as an admin to a Facebook Business Page, you can connect it to Walled Garden to run ads. When you log in to Walled Garden using your personal Facebook account, we securely request access to manage the Pages you're an admin of—these Pages will then appear in your Walled Garden dashboard.
How It Works
Walled Garden uses Facebook's official login to authenticate you. By logging in with your personal Facebook profile, you grant Walled Garden permission to see and manage the Business Pages where you have admin access. This is how those Pages show up in your dashboard—ready for you to run ads from any of them.
Log in to Walled Garden with Facebook
Go to Walled Garden and click the "Login" button. You'll be redirected to Facebook where you'll see a screen asking: "Connect [Your Name] to Walled Garden?"
This screen confirms that Walled Garden is requesting access to your Facebook account. If you've logged in before, it may say "Reconnect" instead.
Connect Your Name to Walled Garden?
This will re-establish your previous settings for this connection.
Not you? Log into another account.
Edit previous settings.
Select "Opt in to all current and future Pages"
On the next screen, you'll be asked to choose which Pages Walled Garden can access. Select "Opt in to all current and future Pages" to automatically include any Pages you become an admin of in the future.
This is the recommended option—it means whenever you're added as an admin to a new Page, it will automatically show up in your Walled Garden dashboard without needing to re-authenticate.
Choose the Pages you want Walled Garden to access
Later you'll be able to review what Walled Garden will be able to do with the Pages you select.
Opt in to all current and future Pages
This will give Walled Garden access to your current Pages, in addition to any Pages you create in the future.
Opt in to current Pages only
This will only give Walled Garden access to the Pages you select.
Walled Garden's Privacy Policy and Terms of Service
Why choose "all current and future Pages"?
This saves you time! When you're added as an admin to a new client's Page, it will automatically appear in your Walled Garden dashboard—no need to log out and re-authenticate.
Select "Opt in to all current and future Businesses"
Next, you'll see a similar screen for Business accounts. Select "Opt in to all current and future Businesses" to give Walled Garden access to manage ads for all Business accounts you're associated with.
This ensures that any new Business accounts you're added to in the future will automatically be accessible in Walled Garden.
Choose the Businesses you want Walled Garden to access
Later you'll be able to review what Walled Garden will be able to do with the Businesses you select.
Opt in to all current and future Businesses
This will give Walled Garden access to your current Businesses, in addition to any Businesses you create in the future.
Opt in to current Businesses only
This will only give Walled Garden access to the Businesses you select.
Walled Garden's Privacy Policy and Terms of Service
Select "Opt in to all current and future Instagram accounts"
You'll also see a screen for Instagram accounts. Select "Opt in to all current and future Instagram accounts" so Walled Garden can run ads that display on Instagram using your connected Instagram business profiles.
This is important because Facebook and Instagram ads are managed together through Meta. Granting Instagram access ensures your ads can appear on both platforms.
Choose the Instagram accounts you want Walled Garden to access
Later you'll be able to review what Walled Garden will be able to do with the Instagram accounts you select.
Opt in to all current and future Instagram accounts
This will give Walled Garden access to your current Instagram accounts, in addition to any Instagram accounts you create in the future.
Opt in to current Instagram accounts only
This will only give Walled Garden access to the Instagram accounts you select.
Walled Garden's Privacy Policy and Terms of Service
Why Instagram access matters
Your ads can appear on both Facebook and Instagram. By granting Instagram access, Walled Garden can show your real estate ads to potential clients browsing Instagram—expanding your reach significantly.
Review permissions and click "Save"
You'll see a final review screen showing all the permissions Walled Garden is requesting. Review the list to confirm everything looks correct, then click "Save" to complete the connection.
This screen summarizes all your choices from the previous steps—including Pages, Businesses, and Instagram accounts.
Review Walled Garden's access request
Receive your email address
Access your Page and App insights
Manage ads for ad accounts that you have access to
Manage your business
Opted in to all current and future Businesses
Access profile and posts from the selected Instagram account
Opted in to all current and future Instagram accounts
Access leads for your Pages
Opted in to all current and future Pages
Read content posted on the Page
Opted in to all current and future Pages
Walled Garden's Privacy Policy and Terms of Service
Click "Got it" to complete the connection
After saving, you'll see a confirmation screen showing "[Your Name] has been connected to Walled Garden." Click the "Got it" button to finish the process and return to Walled Garden.
This screen confirms that your Facebook account is now successfully linked. You can manage this connection later through Facebook's Business Integrations if needed.
Your Name has been connected to Walled Garden
To manage this connection, go to Business Integrations.
Walled Garden's Privacy Policy and Terms of Service
Access your Pages in the Walled Garden dashboard
After clicking "Got it", you'll be redirected back to Walled Garden. All the Facebook Business Pages and Instagram accounts you authorized will now appear in your dashboard, ready for you to create and run ad campaigns on both platforms.
You're all set!
You can now run ads from any Page you've connected on both Facebook and Instagram. If you need to add more Pages later, just go through the Facebook admin process (Steps 1-5) and then re-authenticate with Walled Garden.
Page Not Showing Up?
- Check your admin status: Make sure you've been added as an admin with Full Control (Steps 1-5 above).
- Accept pending invitations: Check your email for Facebook invitations you haven't accepted yet.
- Re-authenticate: Log out of Walled Garden and log back in, making sure to check the boxes for all Pages during the Facebook permission screen.
- Use the correct Facebook account: Make sure you're logging in with the same Facebook profile that has admin access to the Page.
Adding Admin on Mobile
You can also add people using the Meta Business Suite app on your phone:
Open the Meta Business Suite app
Tap the menu icon (☰) → "More tools"
Tap "Settings" → "People"
Tap "Add person" at the top
Enter email, choose role, and assign to your Page
Send the invitation
Some advanced settings may only be available on desktop. If you can't find an option on mobile, try using a computer.
Best Practices
Principle of Least Privilege
Only give team members the specific permissions they need. A content creator doesn't need to manage ads, and an ad manager doesn't need to answer DMs.
Have Two Admins
Always have at least two people with Full Control. If the only admin loses access, the Page becomes nearly impossible to recover.
Regular Audits
Review access quarterly. Remove people who no longer need access, especially former employees or contractors.
Use Business Emails
Always invite by email instead of searching by name. This creates a professional record and reduces the chance of adding the wrong person.
Need Help Managing Client Ad Accounts?
Walled Garden's Agency Mode lets you manage multiple client Pages and ad campaigns from a single dashboard—no more switching between accounts.
Learn About Agency Mode